SInce 2023 I’ve started documenting my projects on Instagram, so come say hello over there: https://www.instagram.com/sukandar.glui/

SInce 2023 I’ve started documenting my projects on Instagram, so come say hello over there: https://www.instagram.com/sukandar.glui/
I’ll be showing my work at this year’s SuperBooth which for the first time features a guitar section aka SooperGrail . Which is a perfect fit for my recent (-ish) focus on all things guitar.
I’ll have a booth, but will also present my work on the stage in the circus tent. Hope to see some familiar faces there, but also meet new people.
Head on over to super.glui.de for the announcement and some details. The main website will be updated afterwards
Following a suggestion from “enjon” I tried the Room EQ Wizard to get a somewhat more meaningful SNR measurement. Here’s the result:
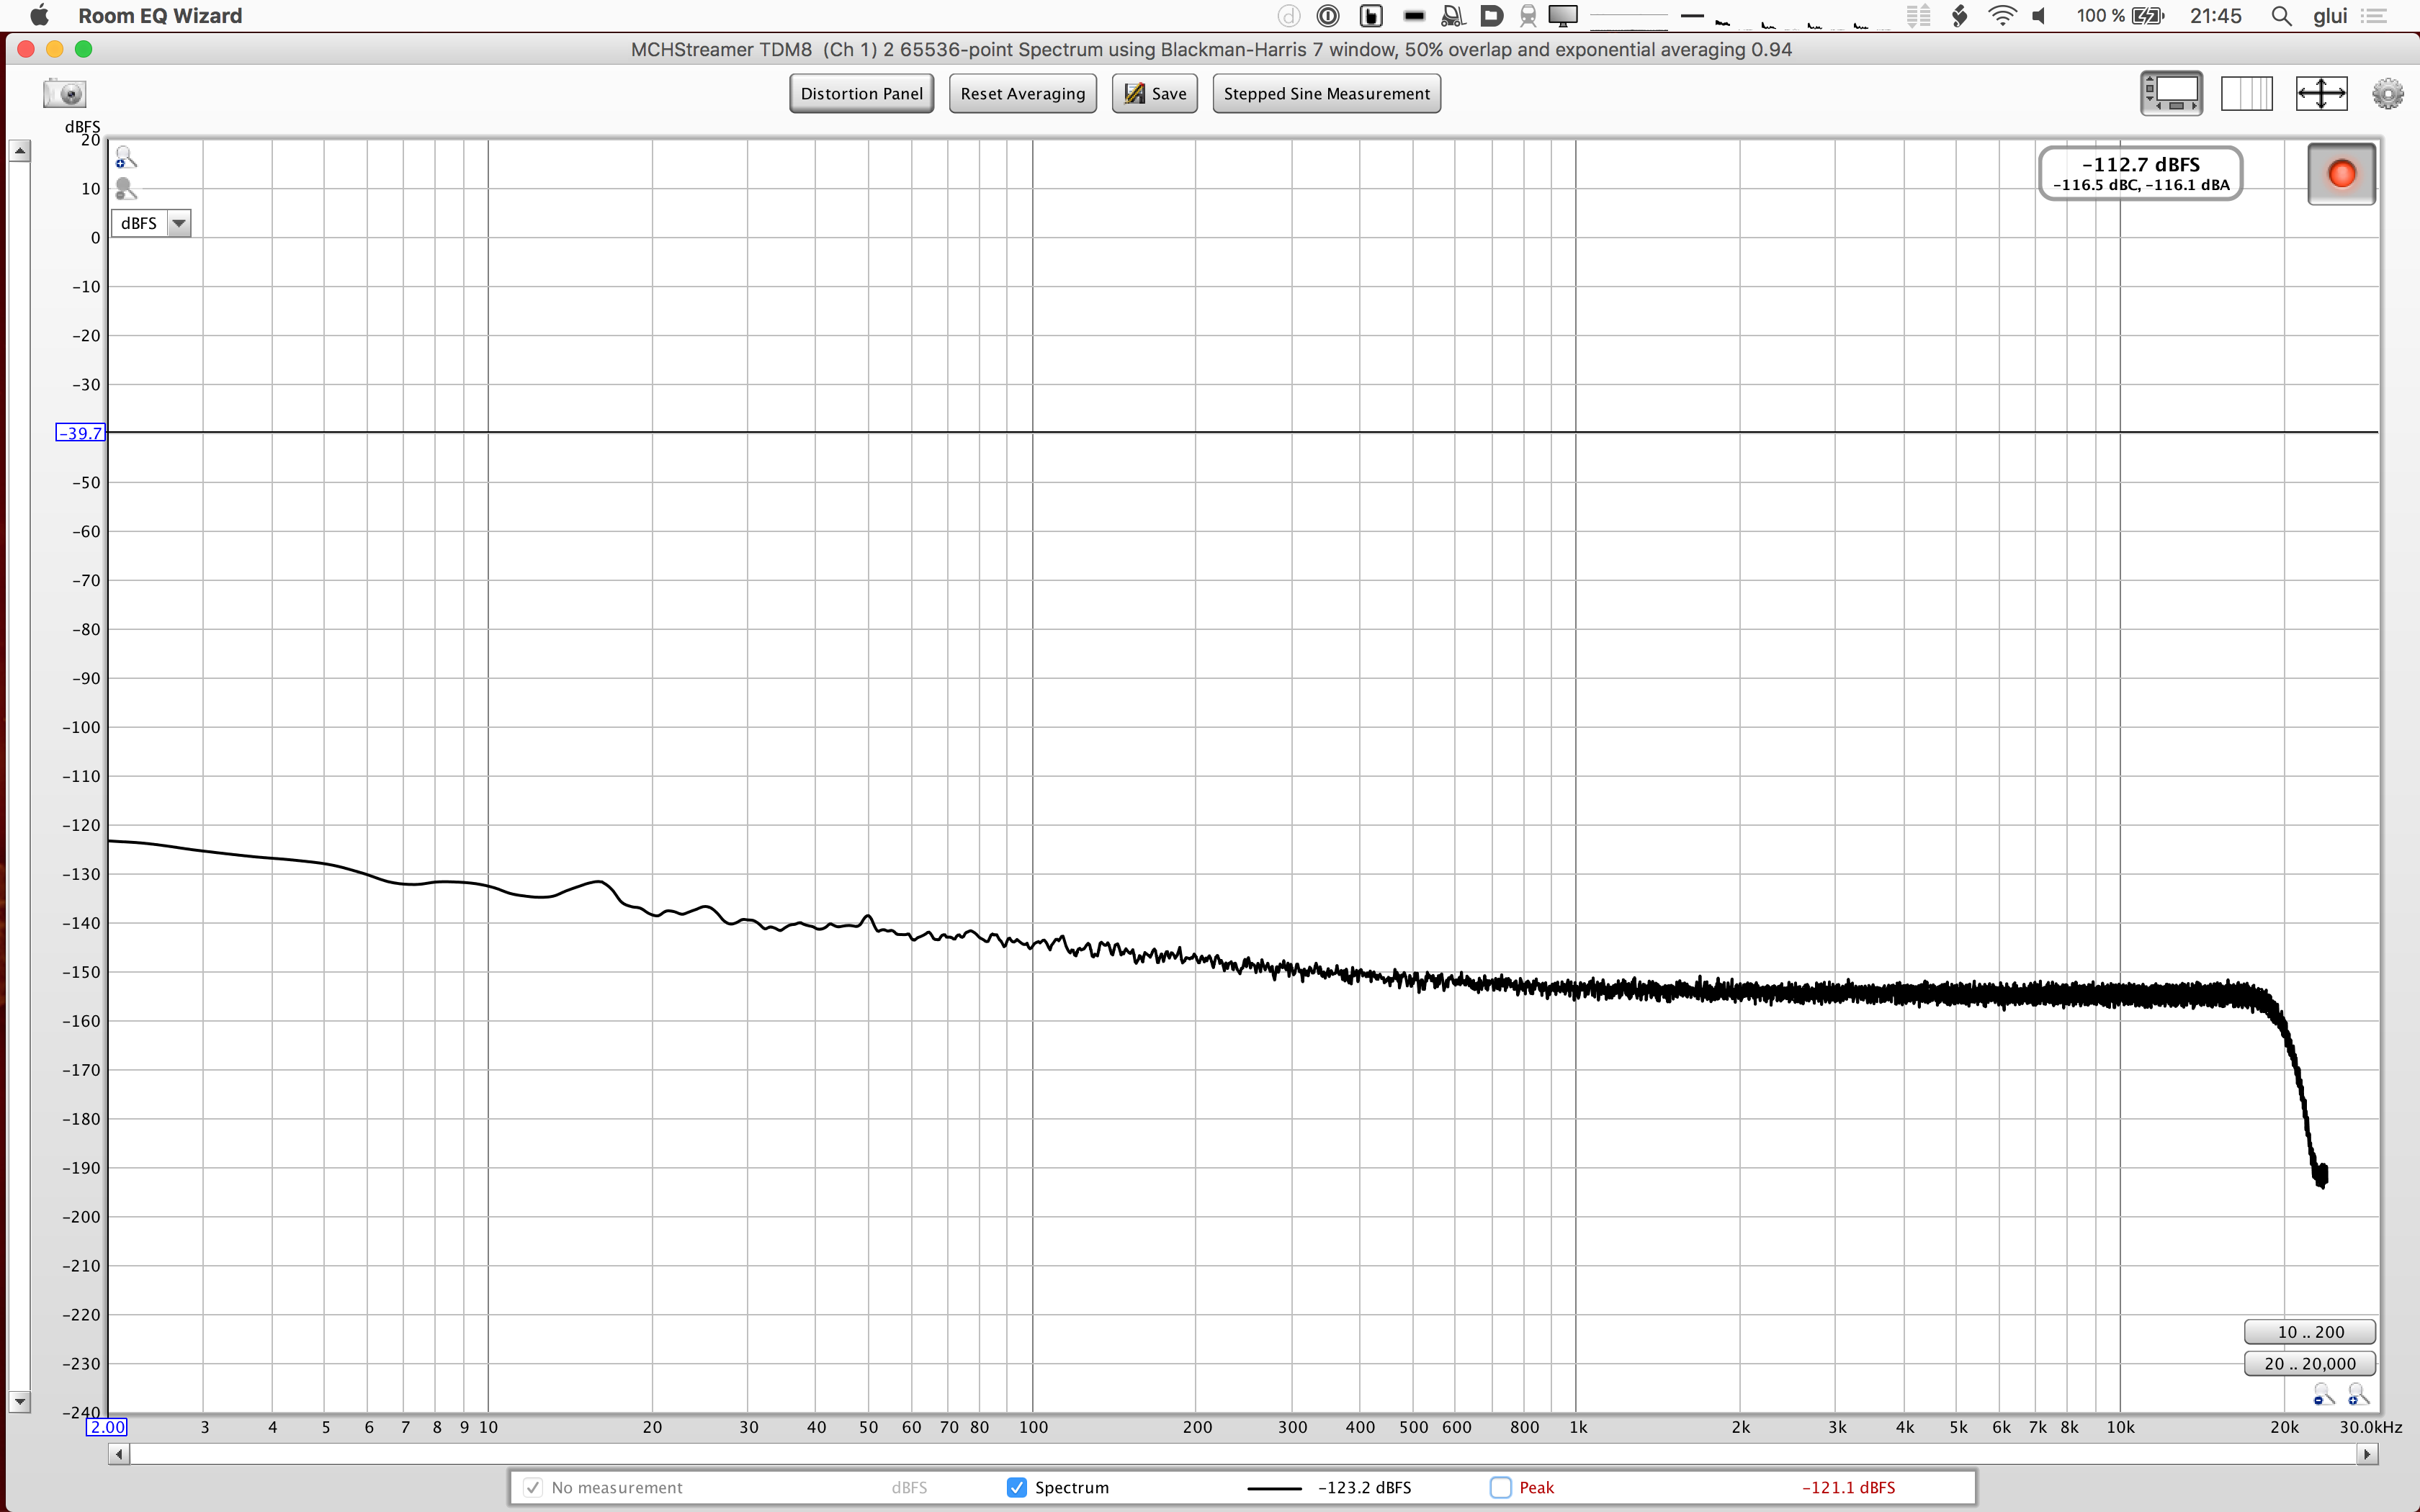
For the moment I’m happy with -116.1dBA, although there’s still a little room for improvement. The low frequency noise could be reduced somewhat, by moving the HP filter cutoff frequency up a notch, closer to the lowest string frequency.
Of course this still doesn’t compare with professional audio measurement gear but it’s definitely better than my initial simple RMS readout. Alas, I do miss having easy access to an Audio Precision Portable One like back in the days at ZKM.
Three more update tidbits:
(Brezel is German for pretzel and it’s what the good folks at former citymusic, Karlsruhe mockingly called my guitar when they saw it the first time. Somehow the name stuck…)
As mentioned in my first post about the new guitar, one goal was to do the analog-to-digital conversion right inside the guitar, to cut noise and hum and other interferences to an absolute minimum.
I know that many guitar players are kinda strangely immune to the constant 50/60Hz buzz from their rig, but I hang out a lot with the Berlin echtzeitmusik scene where musicians often play so reduced, that any fridge or what-not gets disconnect before the show, so its ambient buzzes and gurgles don’t interfere with the music (except when the fridges are part of the line-up of course). There’s also certain experimental playing styles where I have to apply a lot of gain where it helps to have a super-low noise floor.
Converting a guitar to digital also means that one has to modify the whole system, including all the other guitars. So I decided to start this process with my old guitar, in order to gain some experience towards an optimized implementation for the new guitar. It’s also the guitar with the smallest compartment for the electronics, so I wanted to make sure the design would fit in there.
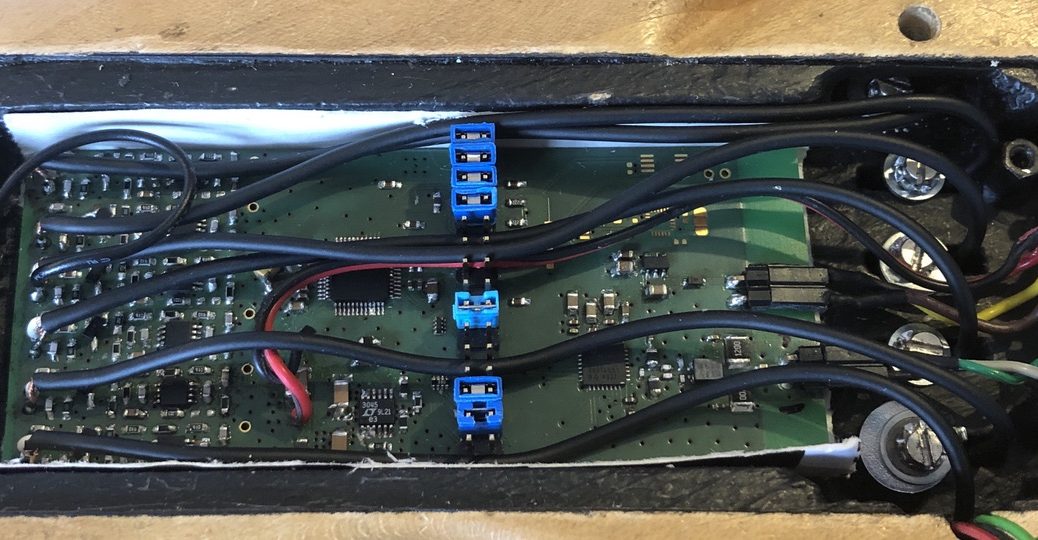
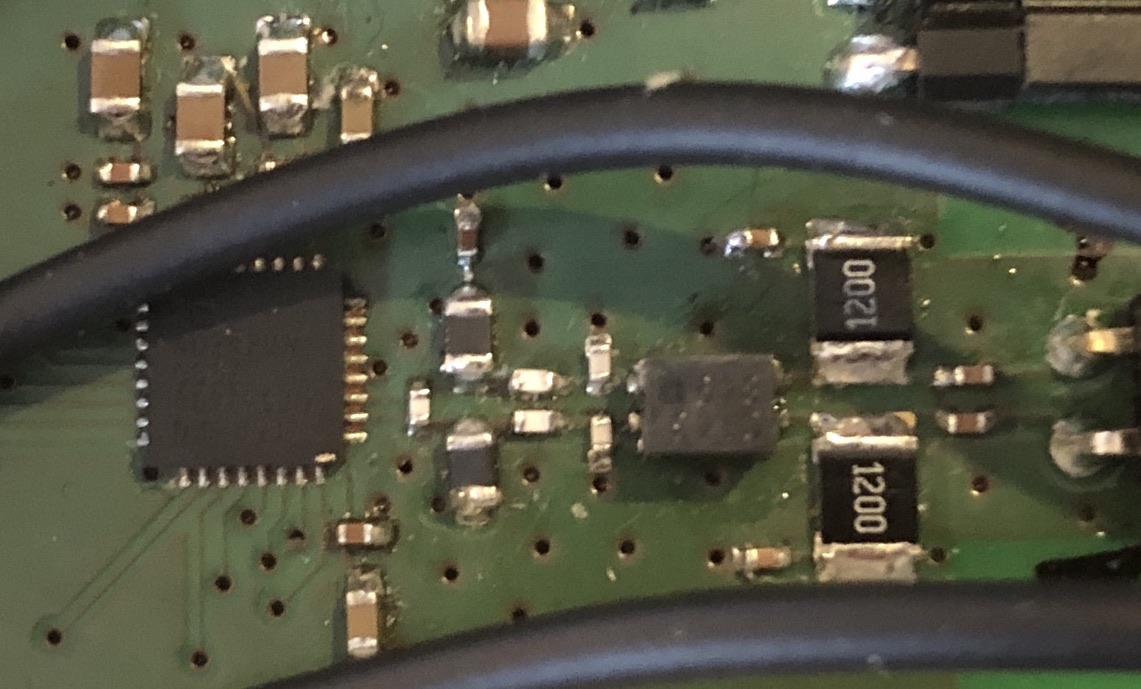
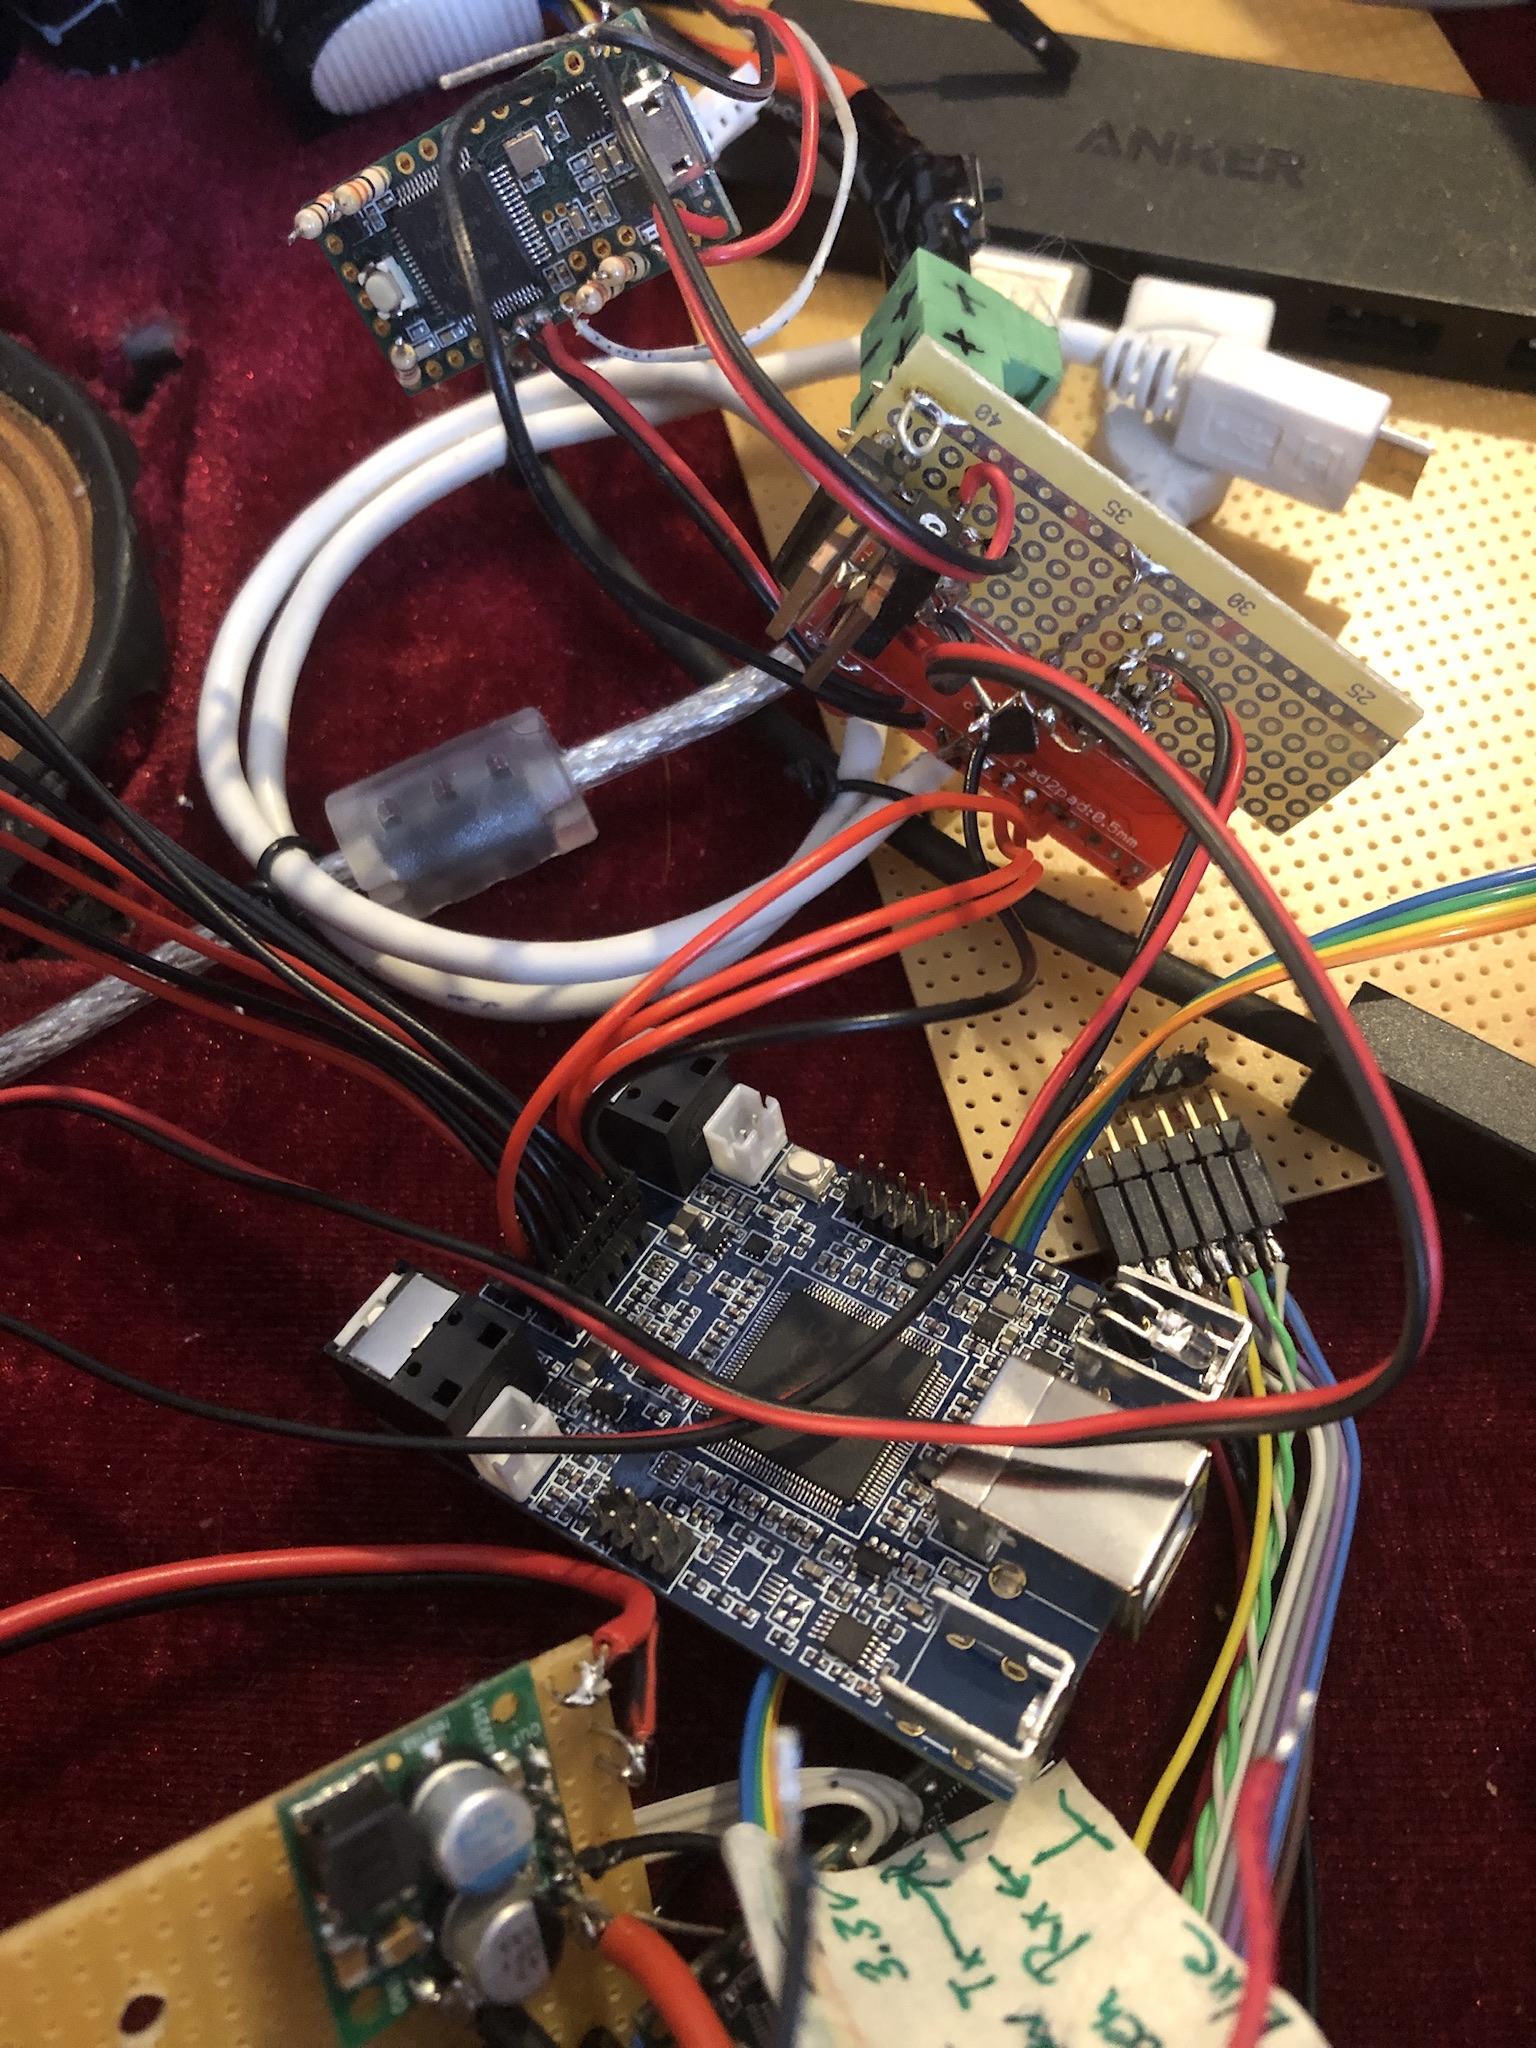
Here’s the analog & converter section of the board:
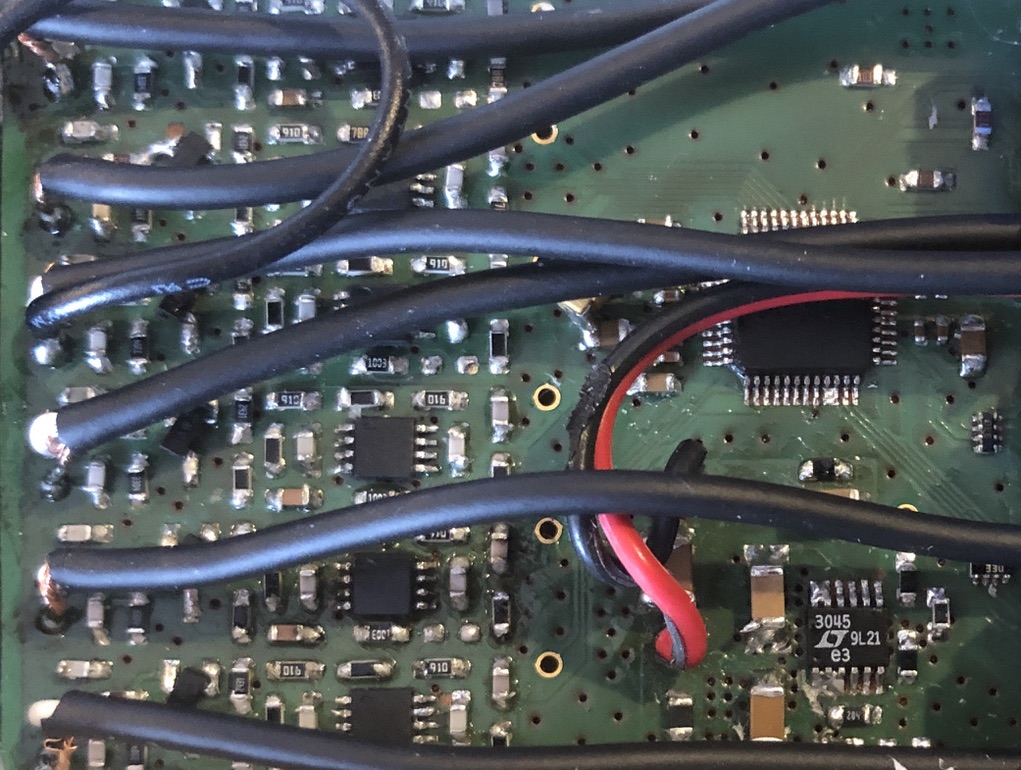
There’s a transistor stage that’s tuned for the high impedance input required by piezo pickups, followed by an OpAmp that does the proper conditioning of the signal towards the ADC inputs, like filtering and balancing. I picked the TI OPA2209 for its low noise floor of 2.2nV/sqrt(Hz).
The ADC is a Cirrus CS5366 which is their best multi-channel option. The CS5381 has better noise figures but it’s only stereo, so then I’d need 3 of them which introduces other problems. The situation for AKM chips is similar.
Finally, there’s the LT3045 regulator. Getting the power supply right is just as important as the chips in the signal chain, so I picked an ultra-low noise type with a high PSRR.
So how low could I get the noise in the end? Well, I don’t have professional audio measurement equipment, so take my numbers with a grain of salt. I simply ran the signal into a MaxMSP patch and fed it into an RMS meter. The lowest I could get was -108dB, which required quite some tweaking – at this level even 1cm of exposed, un-shielded cable picks up quite a bit of hum. I also gave the compartment a proper conductive coating at long last.
In any case that noise figure is close to the theoretical limit of 114dB that the CS5366 datasheet lists, so I stopped further tweakings for the time being
Converting the guitar signal to digital is of course only half of the job – you also need a way to send it across a cable. In the past I had used ADAT and MADI for multi-channel digital transmission. These days it’s all about Ethernet-based protocols like Dante and AES67. However, in the end I opted for an automotive protocol called A2B, which is easier to implement with a smaller PCB footprint:
It still requires (semi-) advanced PCB techniques, like impedance-matched signal routing. Still, with a ~50Mbaud data rate not half as complicated as Gbps-Ethernet (of course you can buy modules that do it for you, but those don’t fit in this guitar. They’re also expensive). A2B allows for “only” 32 signals on one bus, but that’s plenty for my current scenarios. It supports bi-directional communication which will come in handy for the new guitar where I also want to send signals back!
At the receiving end, things are not quite as cleaned up yet: the A2B transceiver is still on a perfboard that is patched into an MCH Streamer from MiniDSP which serves as the USB interface. Plus an extra Teensy to do configuration via I2C. Still lots of work ahead!
Just a quick note that there’s now three guitars on my workbench. Shortly after Julia I also got contacted by Jörg Hiller again, as we never fully got the robo-tuners on his Fender working.
If you look closely you can see the modified Tronical system on the back of the headstock.
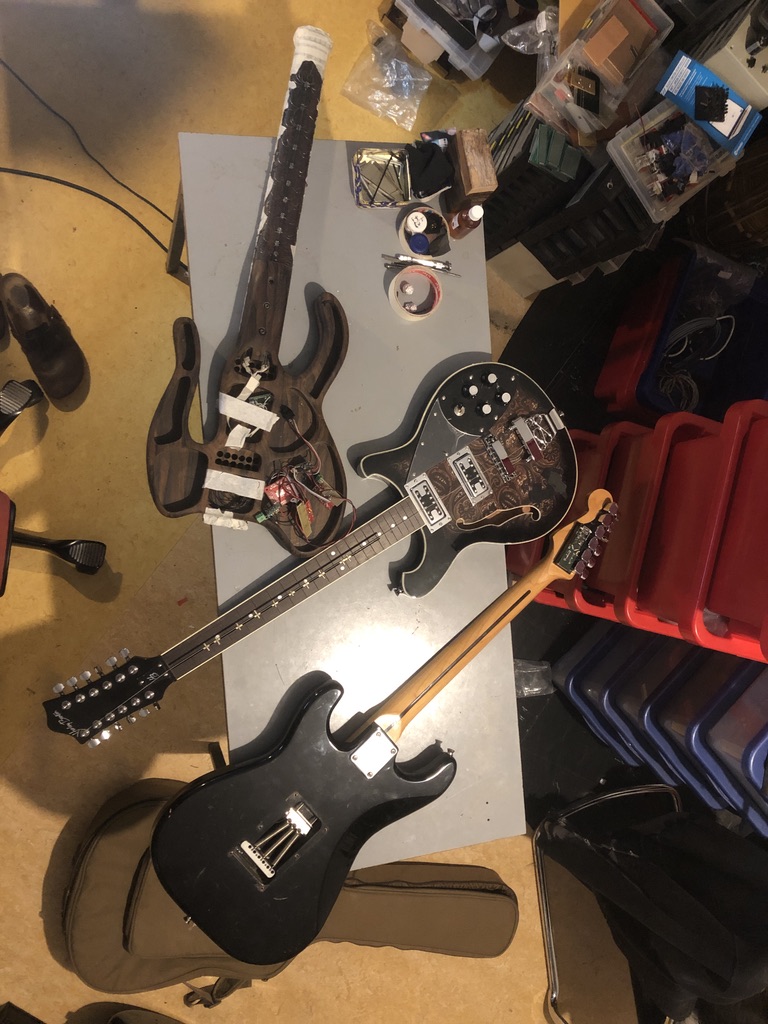
At that rate I might be able to switch to full-time guitar projects soon!!
Who would have thought that fretlets would become a “theme” so fast. While still crazy busy installing the fret scanning system in my new guitar (see previous post), I got approached by local guitar player Julia Reidy about the possibility of modding a guitar for unusual tunings, e.g. just intonation or Asian tuning systems like slendro.
This is not a new idea of course – there’s many examples of such guitars and one can even buy necks with certain tunings. The challenge though was to build this in a way that would allow for experimentation, i.e. with flexible fret positions.
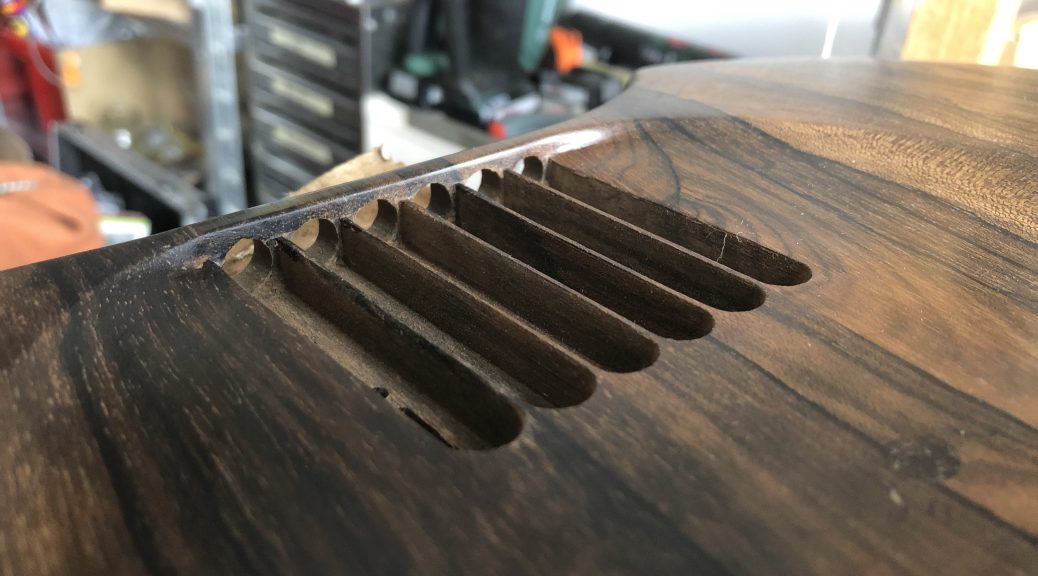
After some research we came across the Youtube channel of Tolgahan Çoğulu and decided to try something similar. The way he approached the problem was to cut long channels into the fretboard and then put fretlets on small pieces of wood that can slide inside these channels.
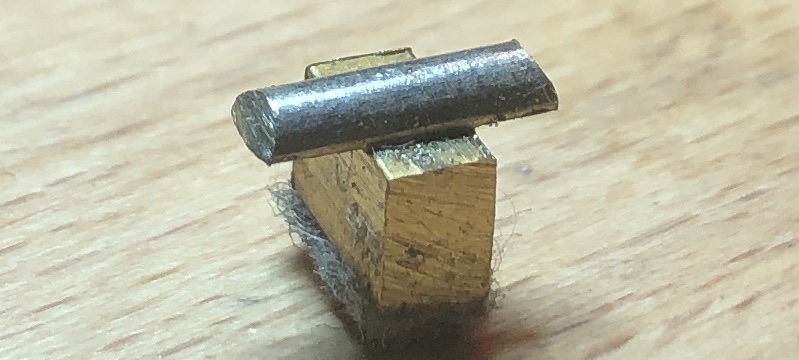
Our first experiments were done on an old beater guitar of Julia’s. I decided to use little pieces of brass instead of wood to put the fretlets on:

The trick is to get the size of the channel just right, so the friction keeps the brass piece in, but allows for it to be moved around.
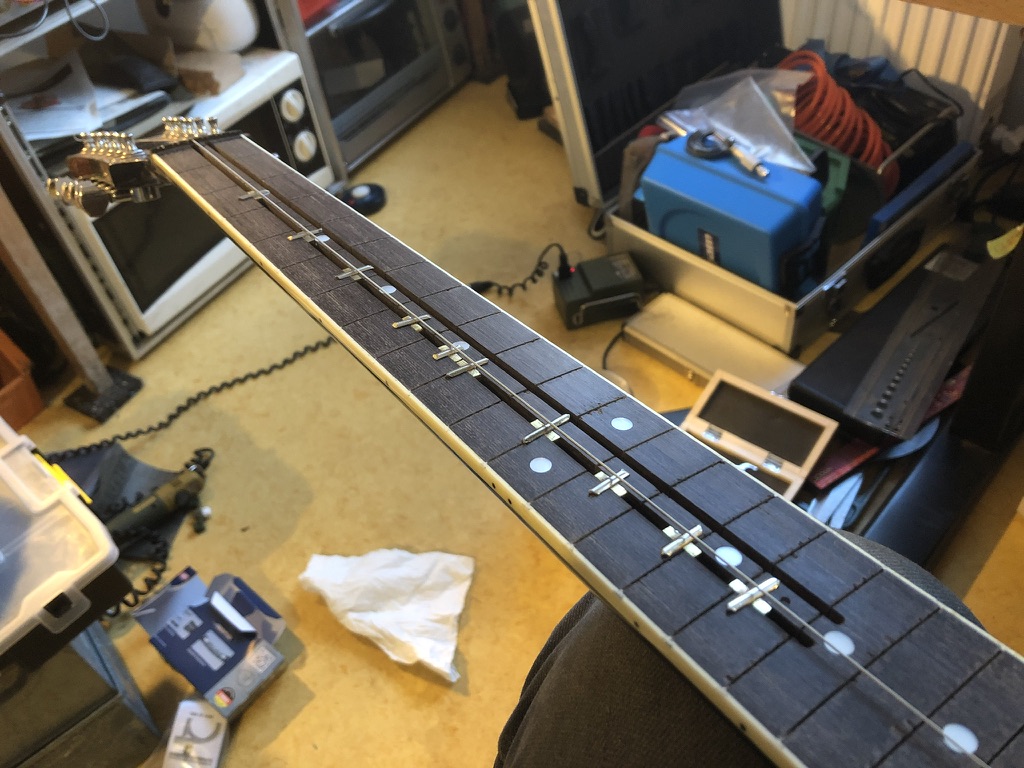
Here’s the neck with 10 pieces:
After this proof of concept, we moved on to the actual guitar. I had an old fretless guitar that I had stopped playing decades ago, so it was the perfect instrument to bring back to life for this.
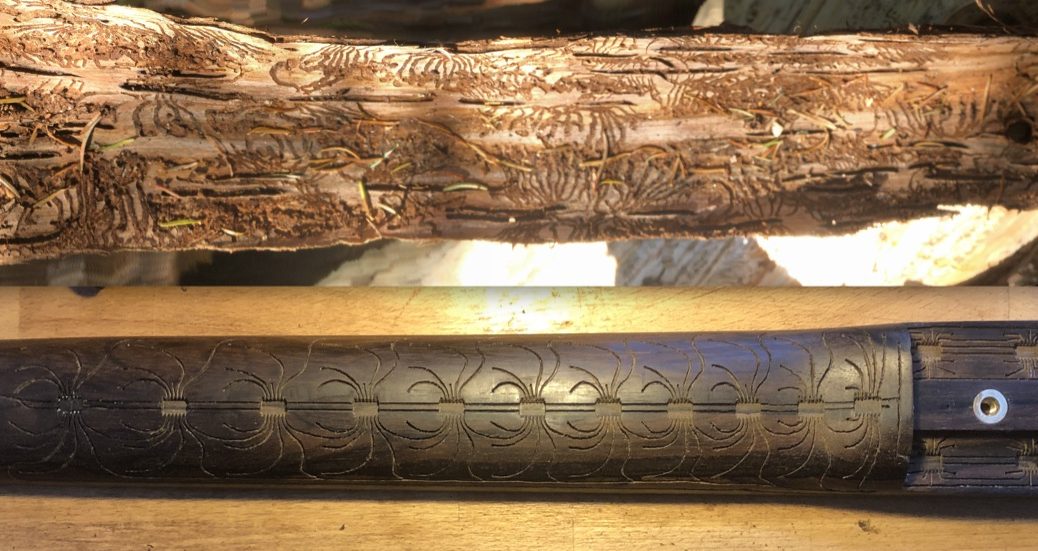
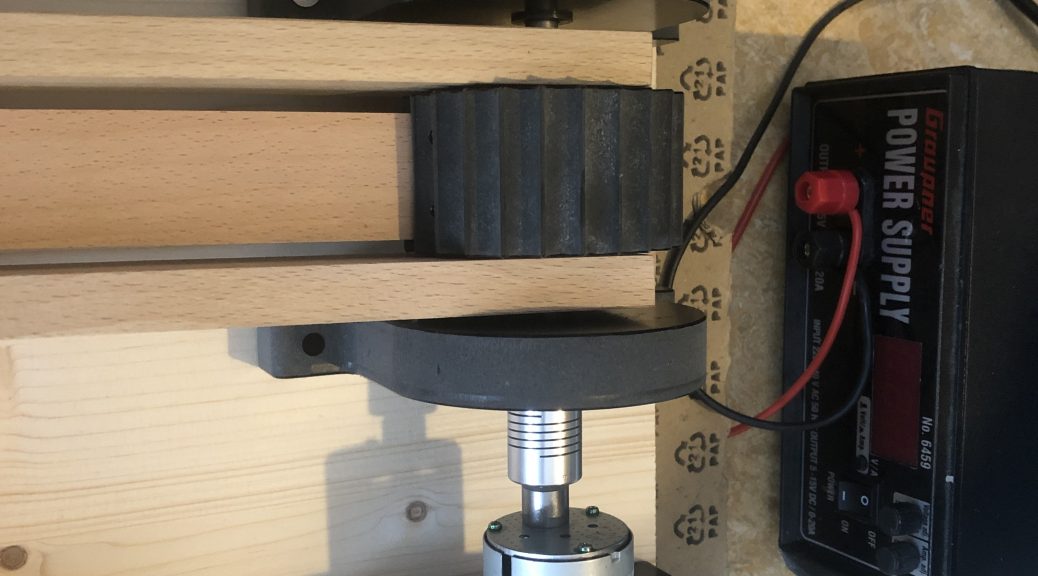
Of course, cutting the channels with the required precision (<0.1mm) was another job for the CNC. Sadly the longest cut I can make with my current machine is 400mm, so I couldn’t do the whole length of the neck in one pass…
…but with some extra effort I eventually got it done:

And here’s a picture by Julia with the majority of the fretlets installed:

Looking forward to the music!
As mentioned at the end of my last post it was now time to finally get some frets into the neck. While usually not such a big deal, the plan was to put a fret-scanner in, which made this task “slightly” more complicated.
There’s two main ways to accomplish fret-scanning. The first one views the strings and the frets as a 2D-matrix, where you send time-multiplexed pulses down the strings and pick them up at the frets. The advantage of this is, that you have to do less wiring (one wire per fret), but you do need to isolate the strings from ground, which I found a bit problematic to achieve. There’s also issues regarding electric interference from the pulses.
The second approach is to divide the frets into 6 isolated segments. This means a lot of mechanical work and a lot of wiring, but the detection circuit is much simpler. Each MCU input is programmed with an internal pull-up resistor, and then you just have to watch for the voltage to drop to zero as the string touches the fret.
Here’s the first few fretlets, as I decided to call these fret segments:
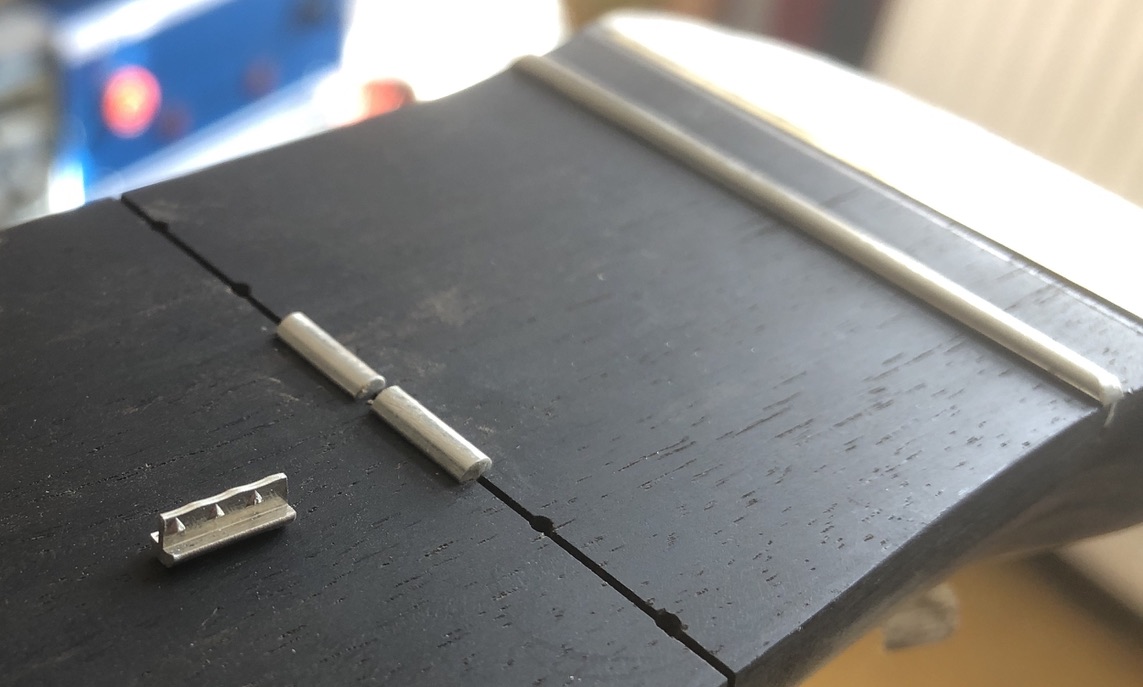
Each has a wire soldered to it that pokes out at the back of the neck
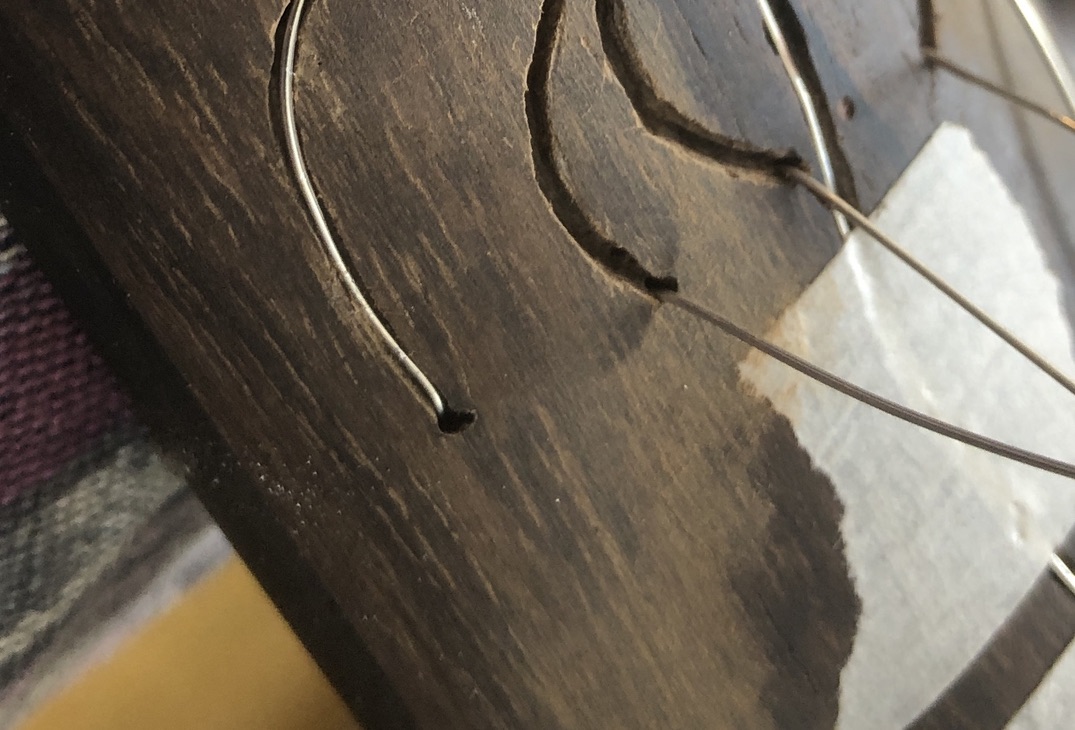
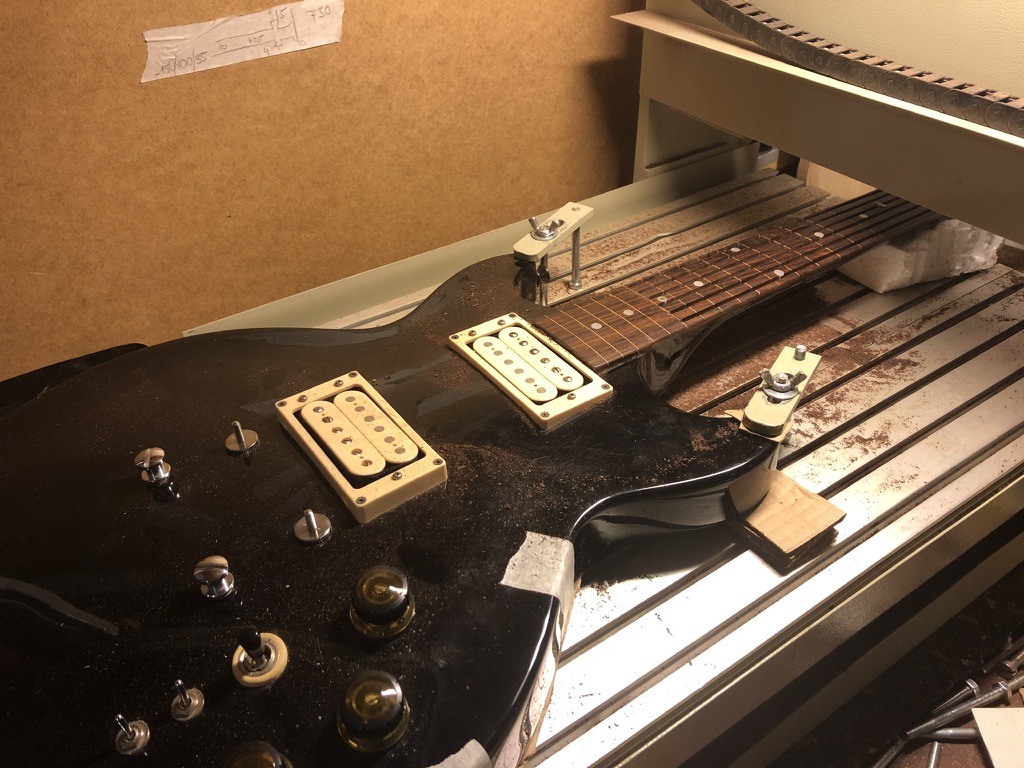
Bringing all these wires (6 x 19 = 114!) to a centralized location wouldn’t work of course, so instead I installed little MCUs right into the back of the neck, one per fret. This, again, was cut with the CNC, using a very small endmill:

There was a limit to how far I could use the CNC though. Taking the curvature of the neck into account would have required a precise scan, and preferably also an additional axis to tilt either the guitar or the toolhead. I wasn’t quite willing to run an extra loop of figuring all this out, so I decided to carve the channels from the MCU to the fretlets with a manual tool.

And here with a chip wired up:

Needless to say that all this carving took a long long time…
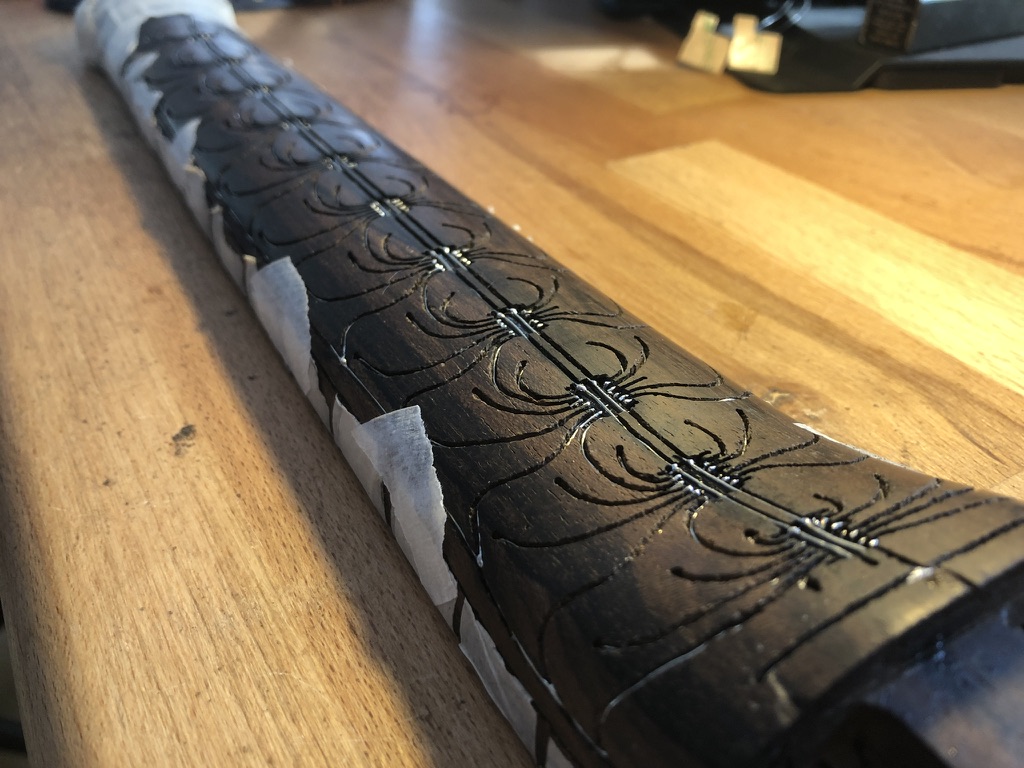
…and got complicated at the neck-body joint:
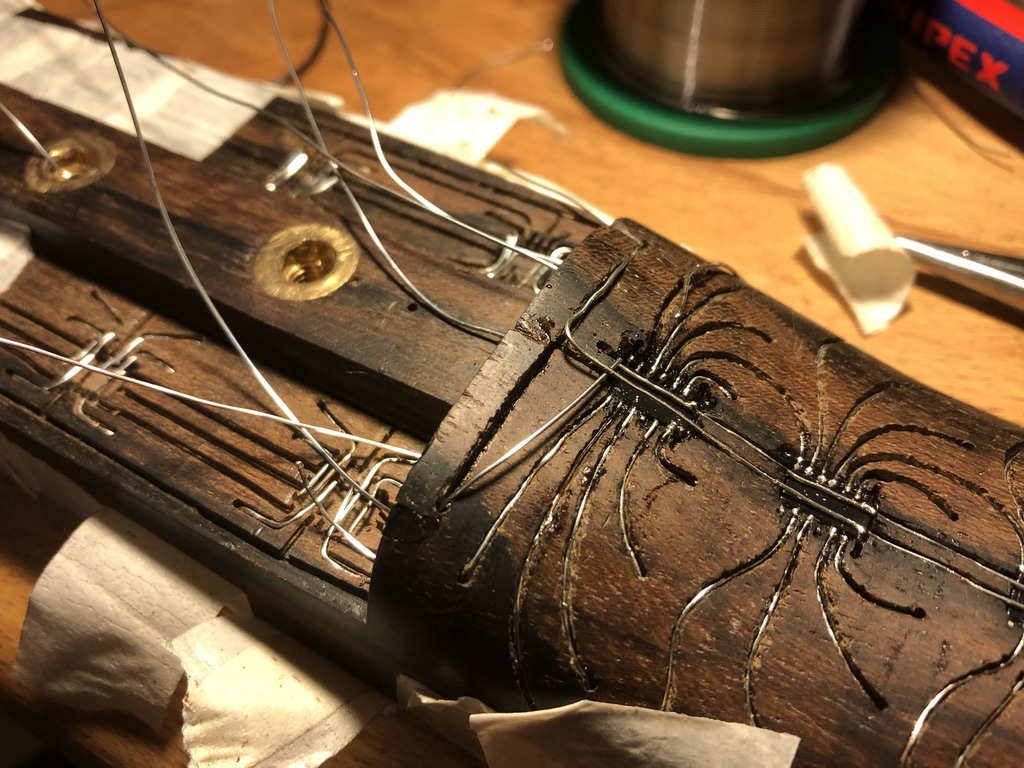
Also had to install some spring-loaded pin-headers to connect to the body electronics.

The individual MCUs are all connected by a daisy-chained SPI bus. The overall update frequency is about 1kHz.
The chips and wire-channels will eventually be covered with clear shellac, but I’ll wait with this until I’m absolutely sure that I won’t have to re-program the MCUs again. So far the detection seems to work quite well though
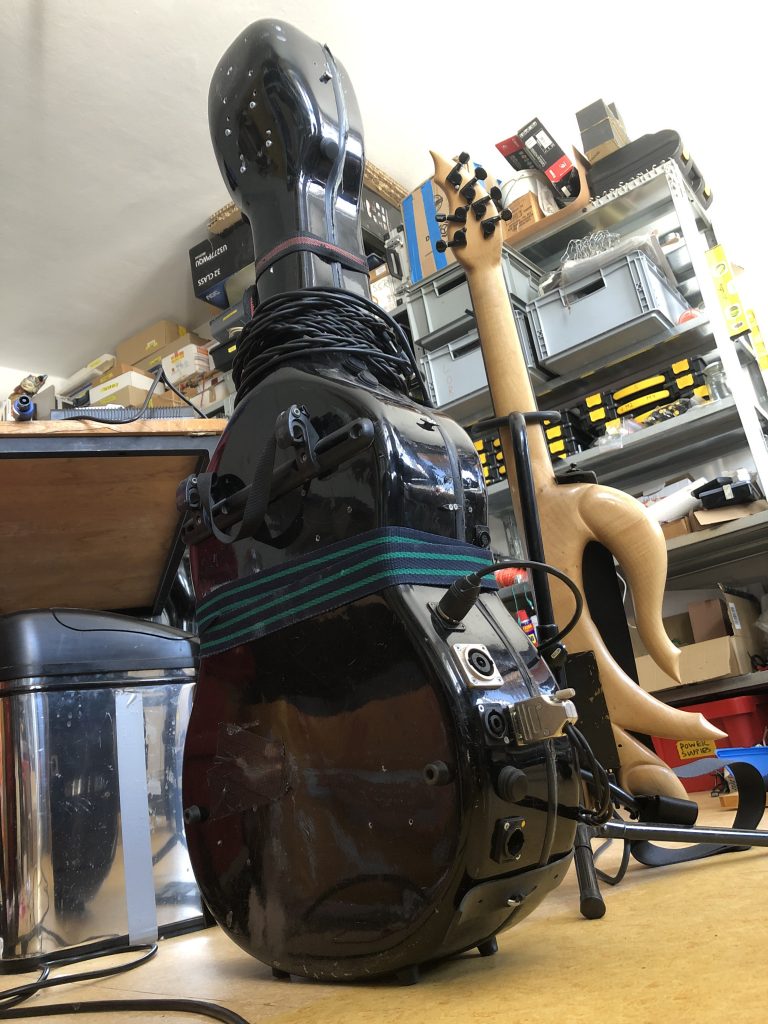
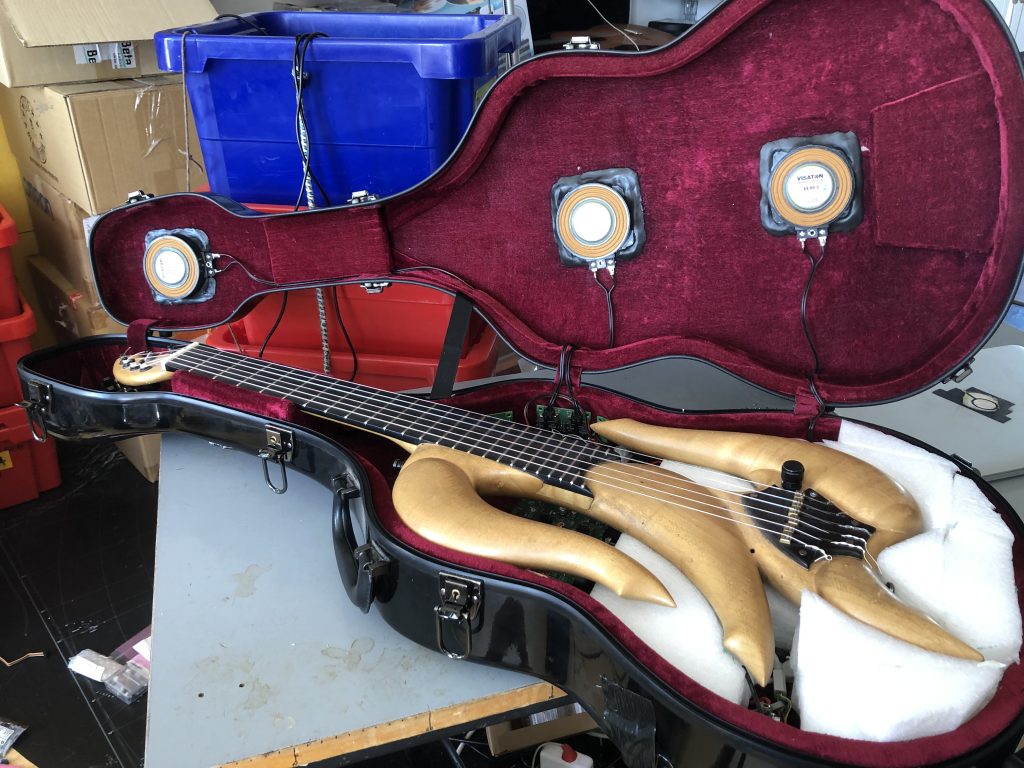
Ever since I started making music again in ~2013, my main guitar amplifier has been the very case that the guitar travels in. I use this for all solo performances, as well as my duos with Werner Cee, Chris Abrahams, and most notably IMD with Axel Dörner.
The idea to use transducers to turn its shell into a speaker had intrigued me for a long time, however previous attempts had failed simply because the first cases I tried this with were made of ABS plastic which kinda sounds like a wet sack. So only after I came across a guitar case made of epoxy did this whole idea come to fruition.
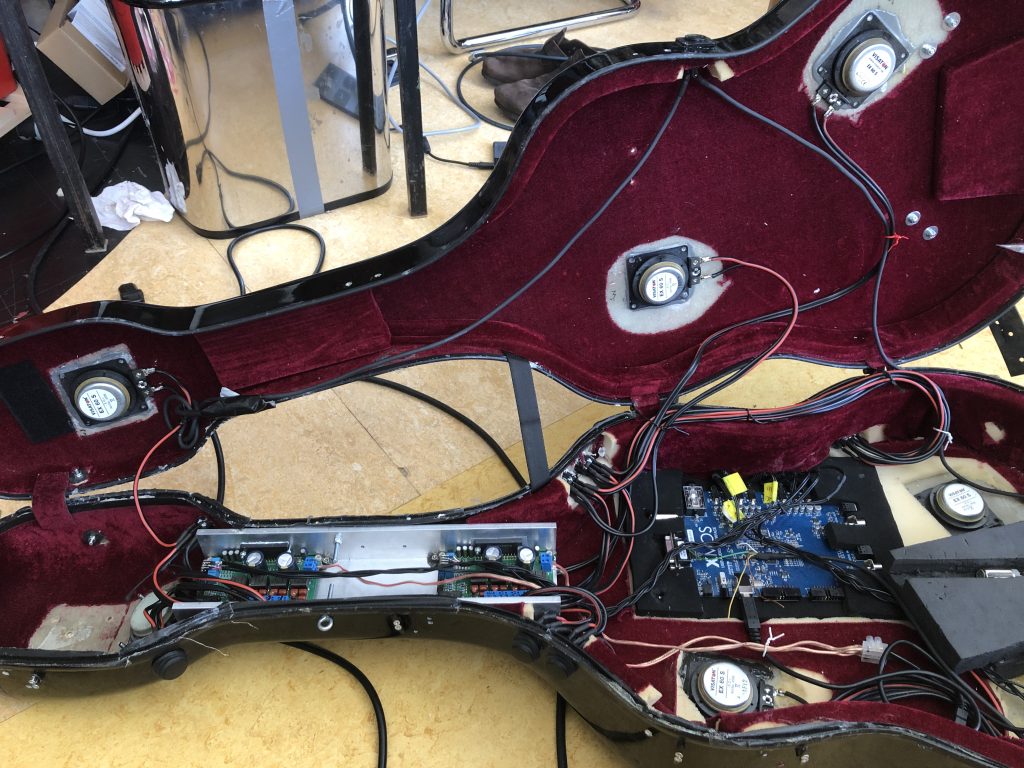
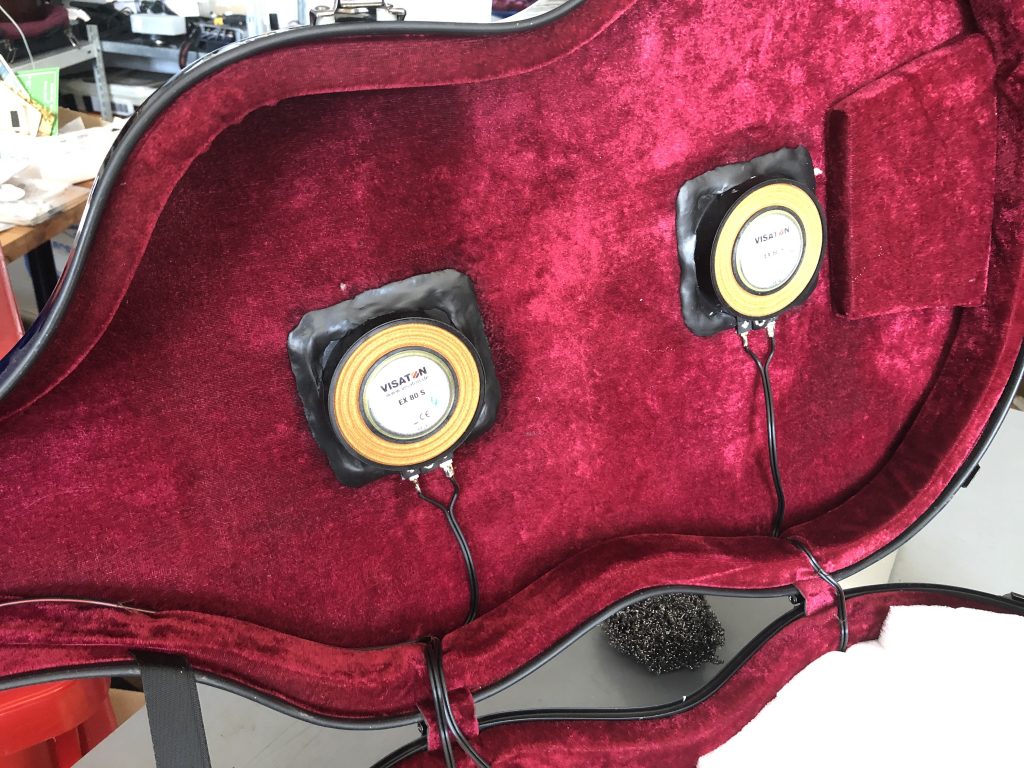
I put in a total of 6 transducers to go with my 6-channel per-string processing that I’ve been employing for all my setups during the last 30 years. Their different locations also means various filtering effects as sound is panned across the outputs. I do compensate for this in software to a certain extend, however for the most part I embraced this natural behaviour.

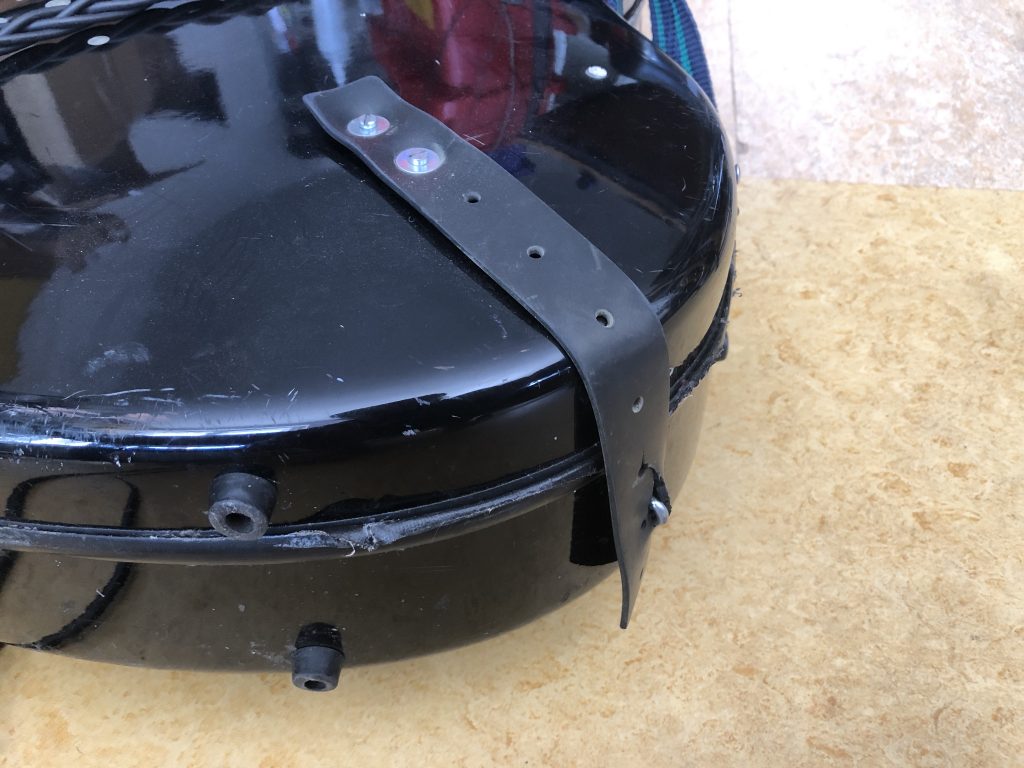
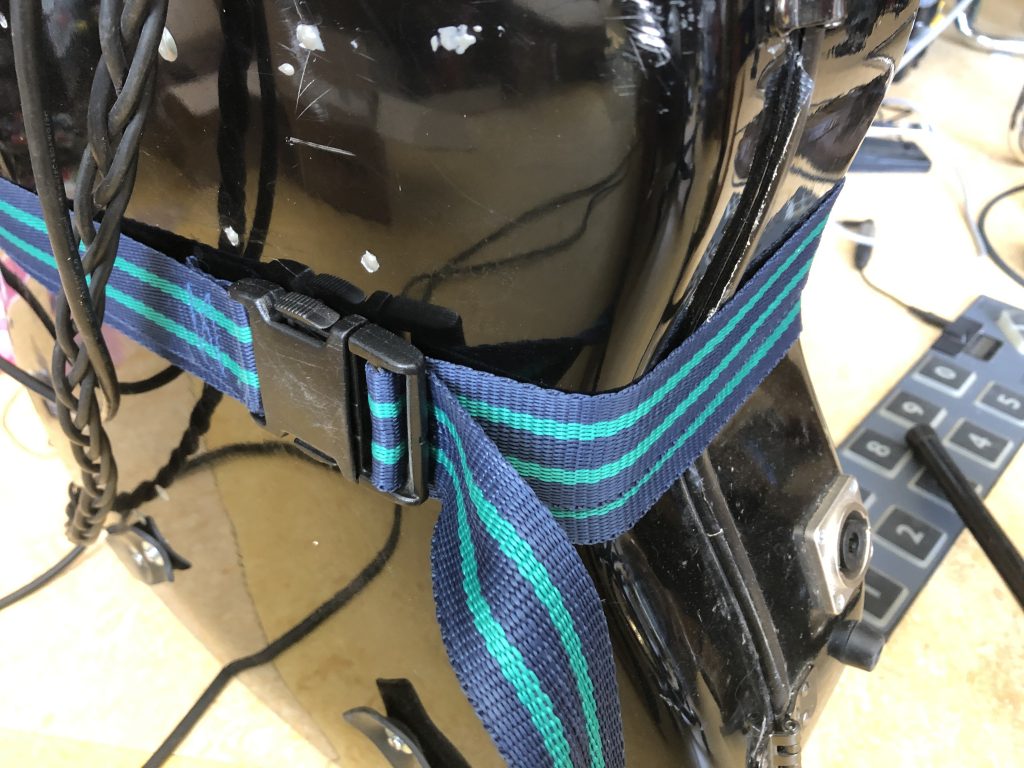
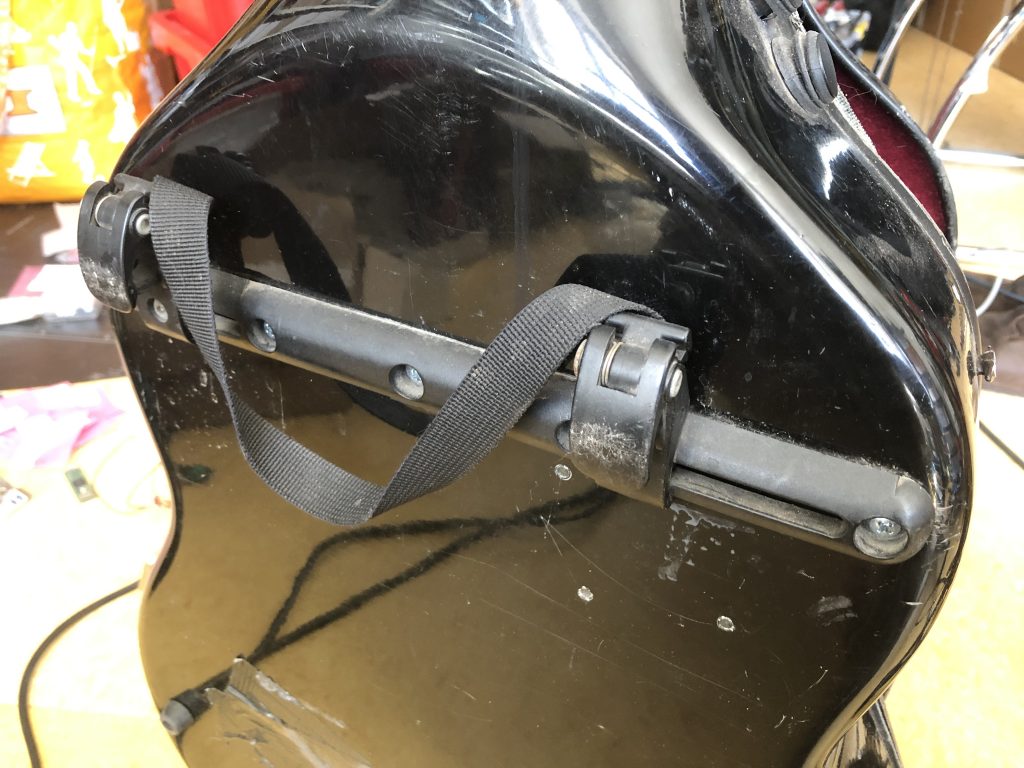
One issue you run into when setting the whole shell into vibrations is that you have to make sure to dampen any mechanical buzz that can emanate from basically anything that’s connected to it, most notably the latches. So in the end I removed them all, but then kinda struggled to find a replacement to keep things shut tight.
A rubber band:
Sail-boat like posts
And this is what I use today – an ordinary suitcase belt…
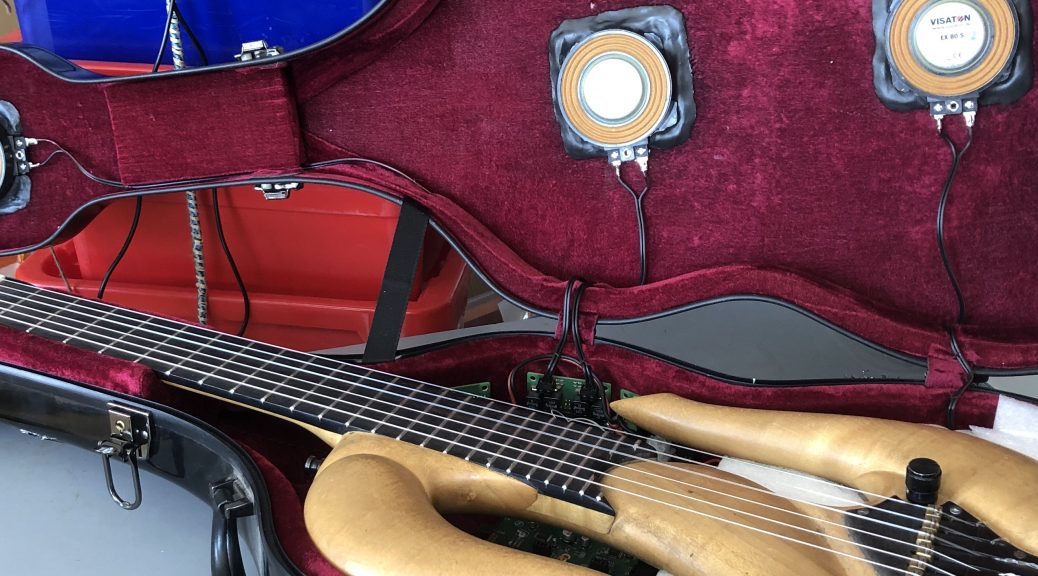
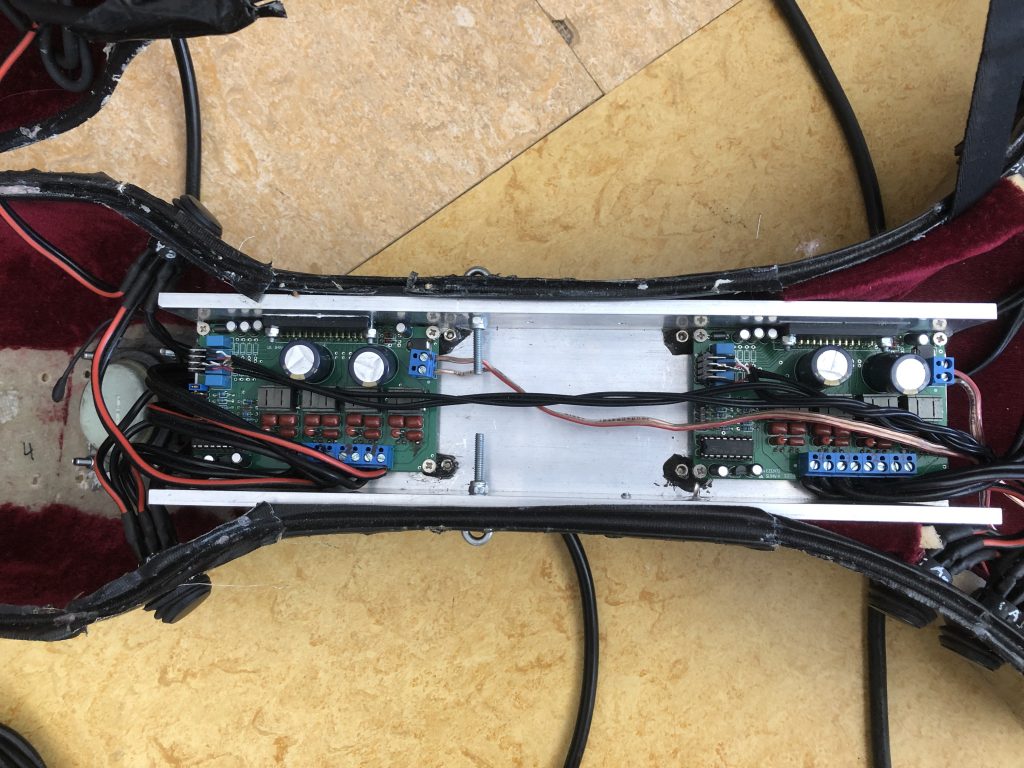
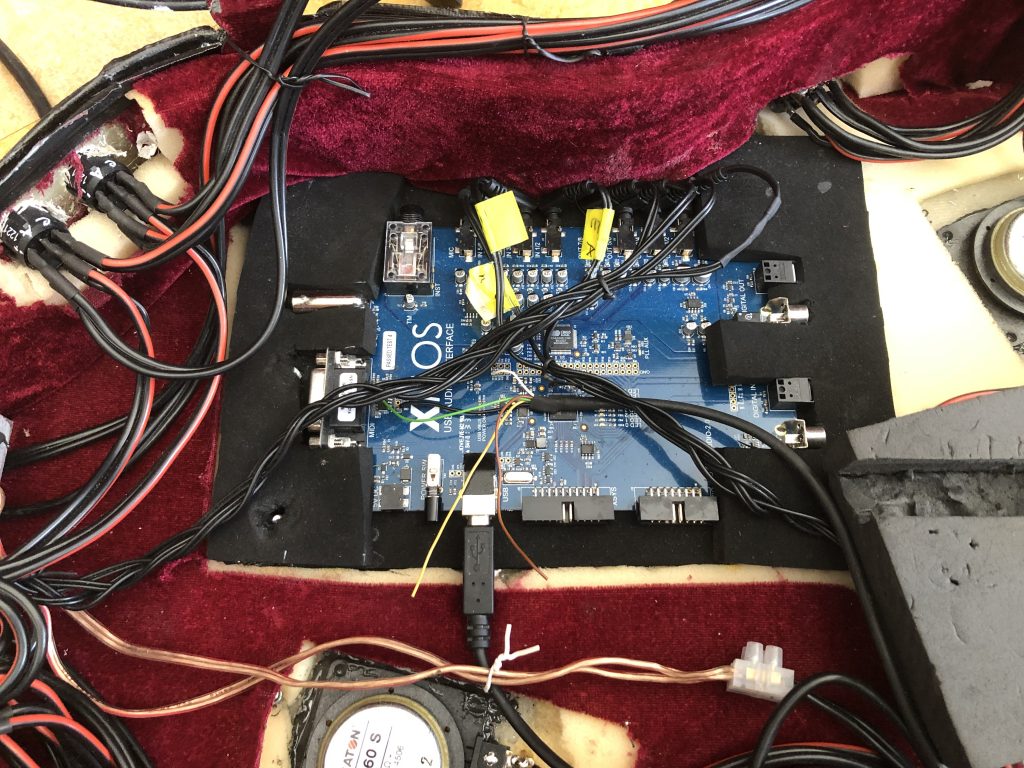
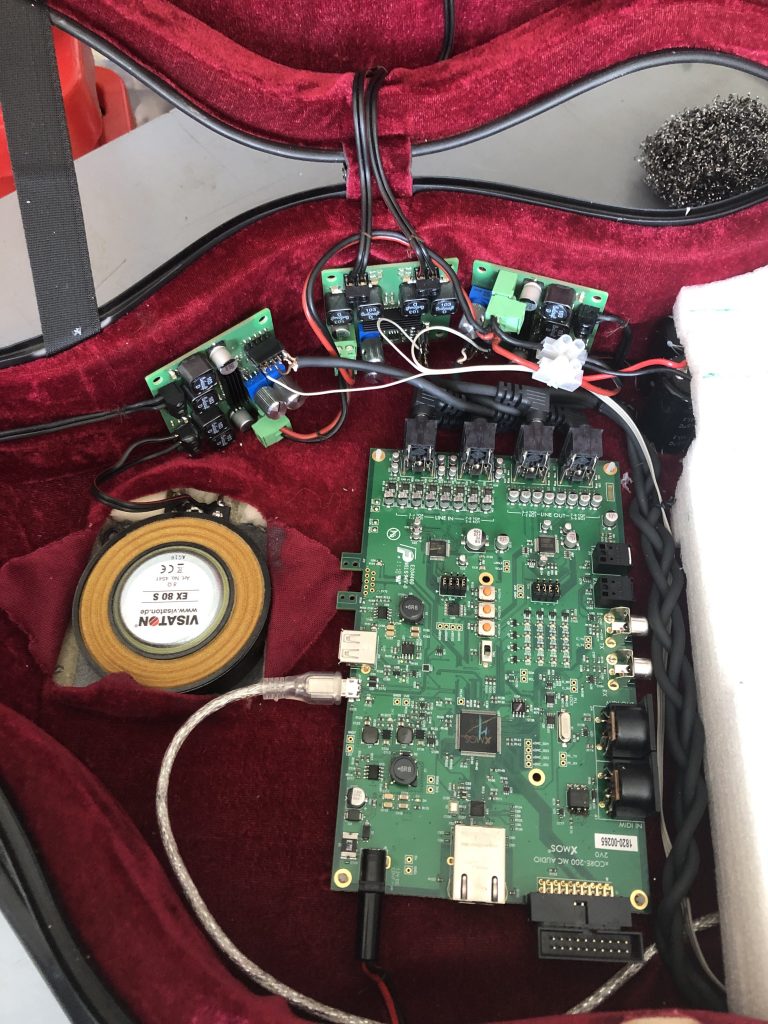
Here’s some more pictures of the inside:
8-channel amplifier (50W Class-D)
6-in, 8-out sound card (XMOS dev. board)
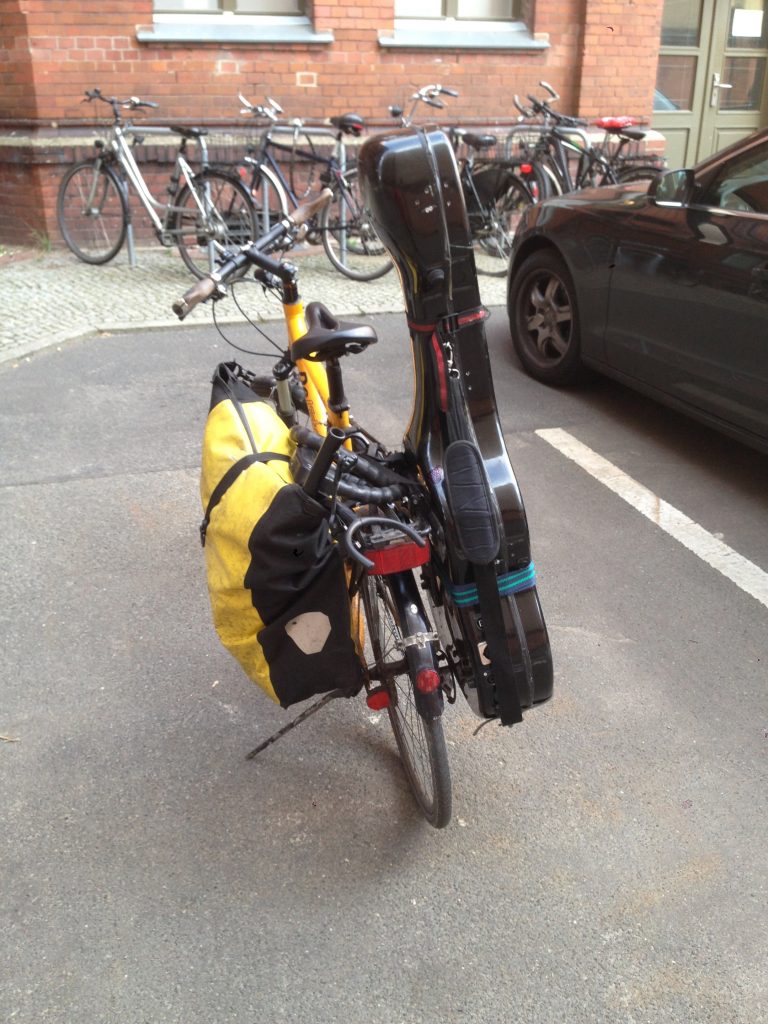
Despite this mess, the guitar still fits in and can be safely transported.
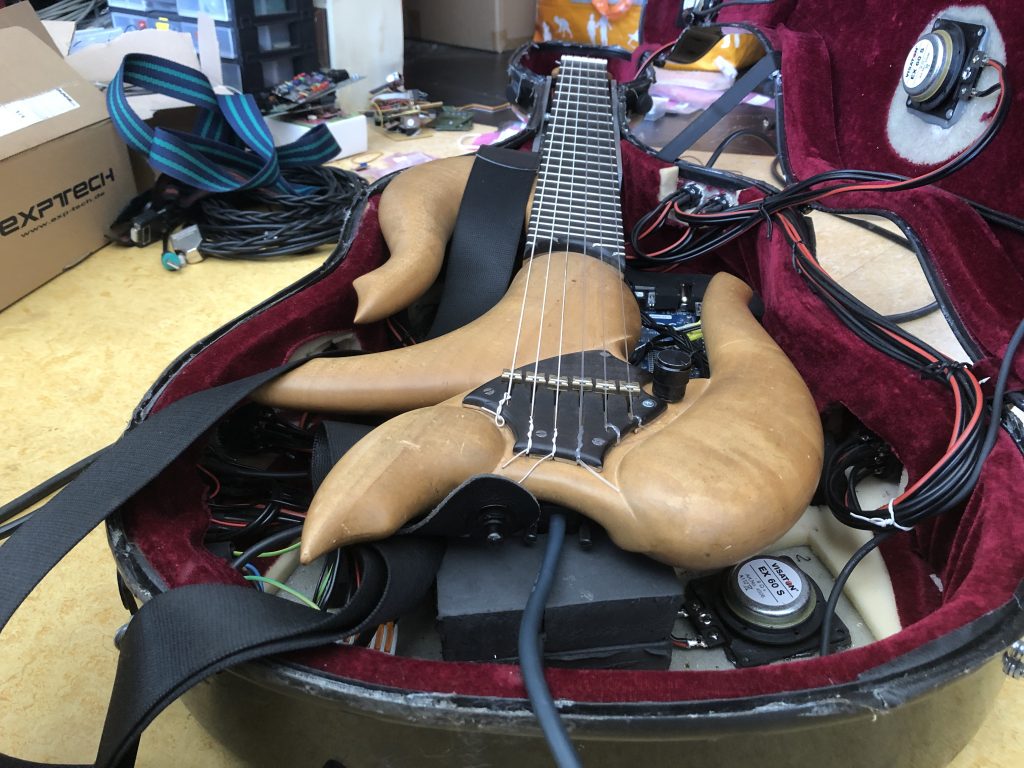
In fact I installed a pannier handle and can lug my whole setup with my bike (at least to local gigs)
So why “new guitar case amp”? Well, lately the original build has been cracking at the seams – I had to replace broken transducers, fix cabling, and various mechanical issues. I also wanted to upgrade to a beefier power supply and type of transducer as well as a better soundcard. Mostly though, the whole effect processing should be embedded as originally intended, rather than always connecting a laptop externally. Moreover, as the new guitar will have a digital output, this needs to be reflected by the overall system design. So, as often, too many things to modify at once…
Sometimes then, it’s helpful when outside events force your hand a bit and you gotta move forward with a partial build. In this case that’s a concert I’m playing next Wednesday (Aug 26th) with Axel at Au Topsi Pohl, where I thought it would be a good idea to have a new blog post along with the newsletter invitation. If you read this in time and wanna come, make sure to rsvp on their website (because, you know, COVID-19 and limited seats and all)
Anyway, here’s some pictures of the current state:
New transducers
New soundcard
Cleaner wiring
But no embedding yet and no digital guitar link either. Stay tuned for updates on that!
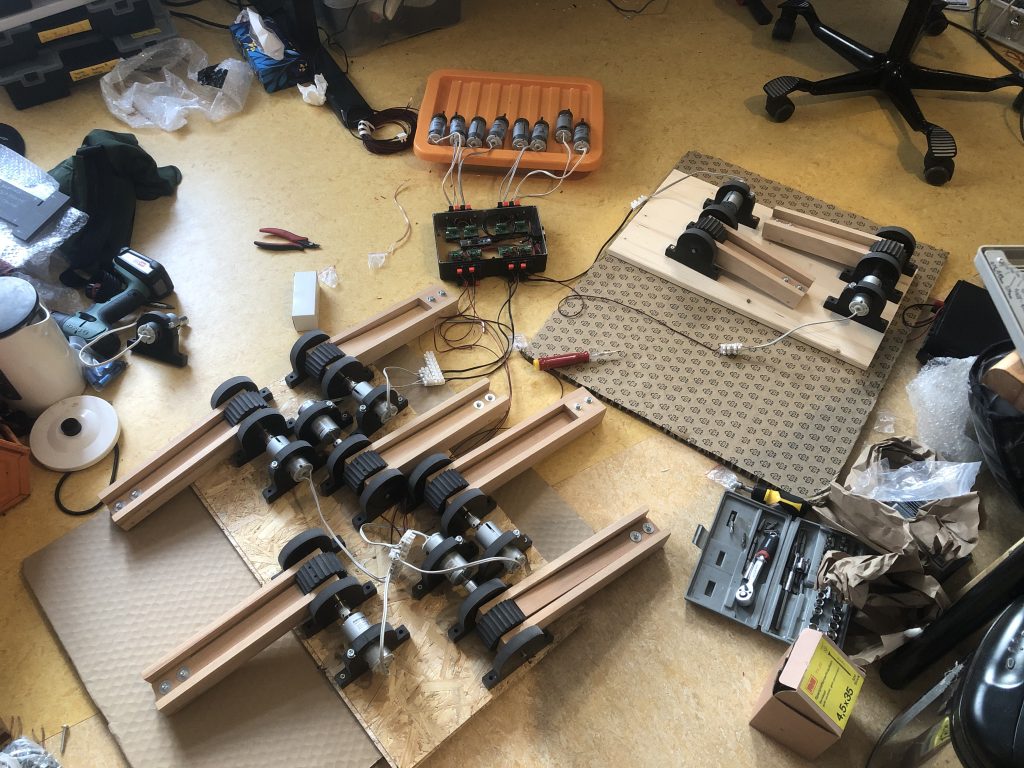
This project dates back to 1998, right after I had relocated to Berlin, when Jens Brand approached me about building an interface to control a series of geared motors. These motors were then connected to the axes of a number of ratchets, the general concept being to create very loud, computer-controlled sound, but without employing a speaker system.
Ratchets are used in Germany during the carnival season and even a single one can be brutally loud, even outdoors from a distance. So imagine 8 of these in a small room! If I remember correctly he once did a duo concert with a guitar player using a big Marshall stack, and that the latter was not audible anymore when the ratchets where running at full speed.
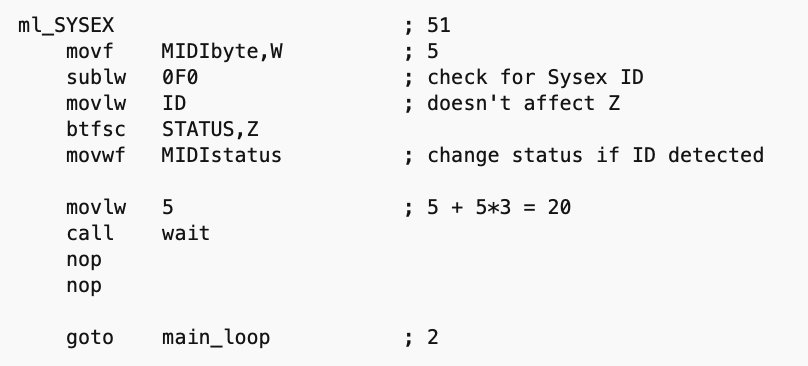
Back in 1998 there wasn’t a strong maker scene and no distributors like Adafruit or Sparkfun to provide all the control and driver modules that we can choose from now . So the interface was build from scratch, using a Microchip PIC16F84 and discrete MOSFET drivers. The controller didn’t even have sufficient PWM outputs, so it was programmed in Assembler with what I called “synchronous code”. What this meant was that I took note of the execution times of each block of code and added extra NOPs to match them to the PWM frequency. All while polling the serial input for MIDI messages.
Sadly there’s no picture of this initial build and in fact the reason why Jens approached me about making a new version was that the original device had been stolen :(
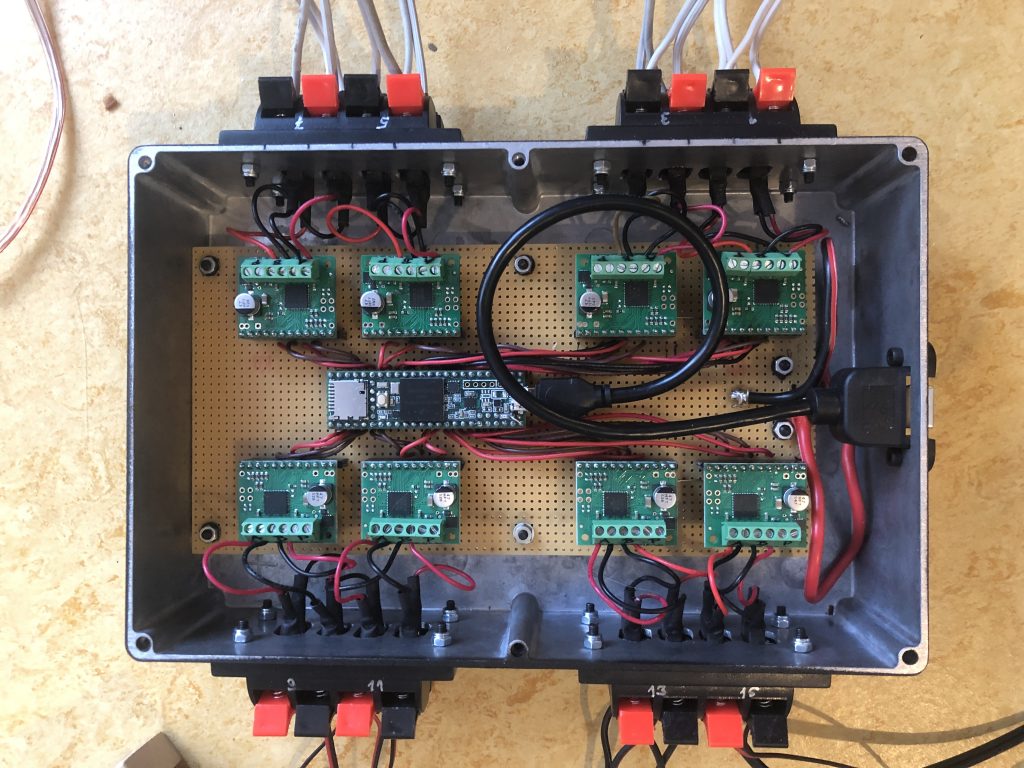
My go-to microcontroller in 2020 is the Teensy which is build around an ARM processor and programmed thru the Arduino IDE. I like its combination of small form factor, sufficient pin count, and processing power. There’s even a cool Audio Library.
To drive the motors I used some Pololu driver modules, and then all I had to do was to mount all these modules on perfboard and connect them with wires. Not a single discrete component.
The ratchets themselves were also worn down from decades of use, so they needed to be rebuild as well, which was done by our joint friend Paper Blattmacher.
Sadly, the premiere at Phill Niblock’s Experimental Intermedia had to be cancelled (*) due to COVID-19, but I hope we’ll soon have a chance to hear this instrument again.
* actually it was streamed, but that doesn’t convey the physical experience at all
Not much to write about the last 6 weeks – it’s been mostly sanding and polishing a lot. But wanted to share some pictures as it always feels quite rewarding when you’re done with the finest sandpaper and apply some wax.
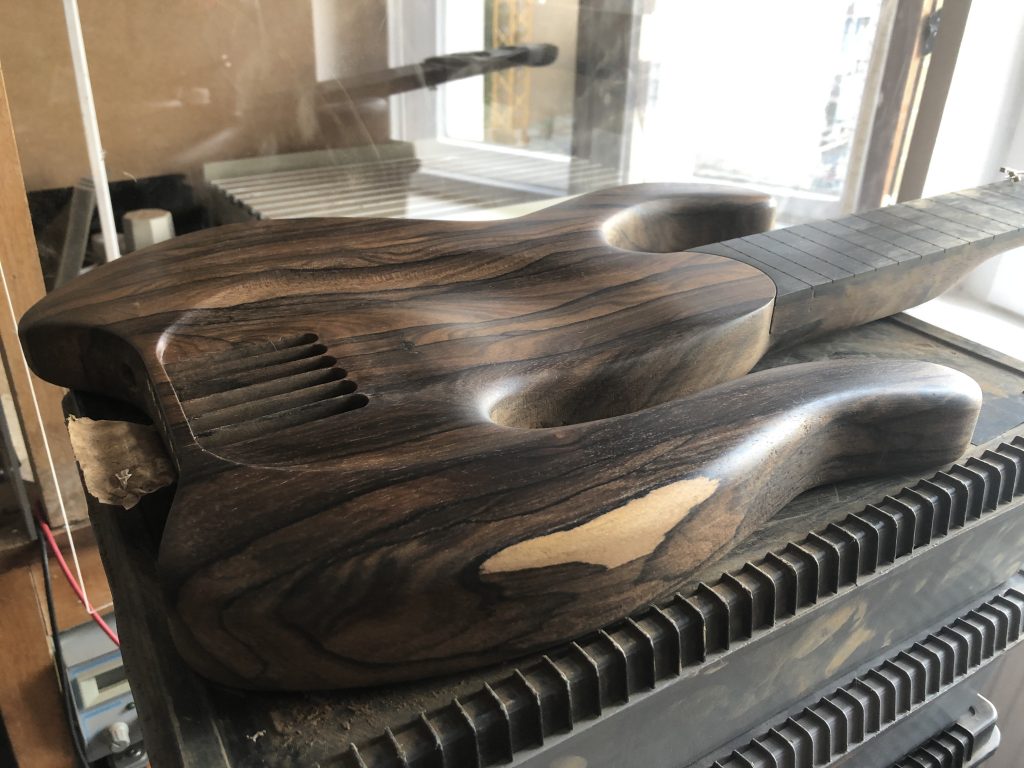
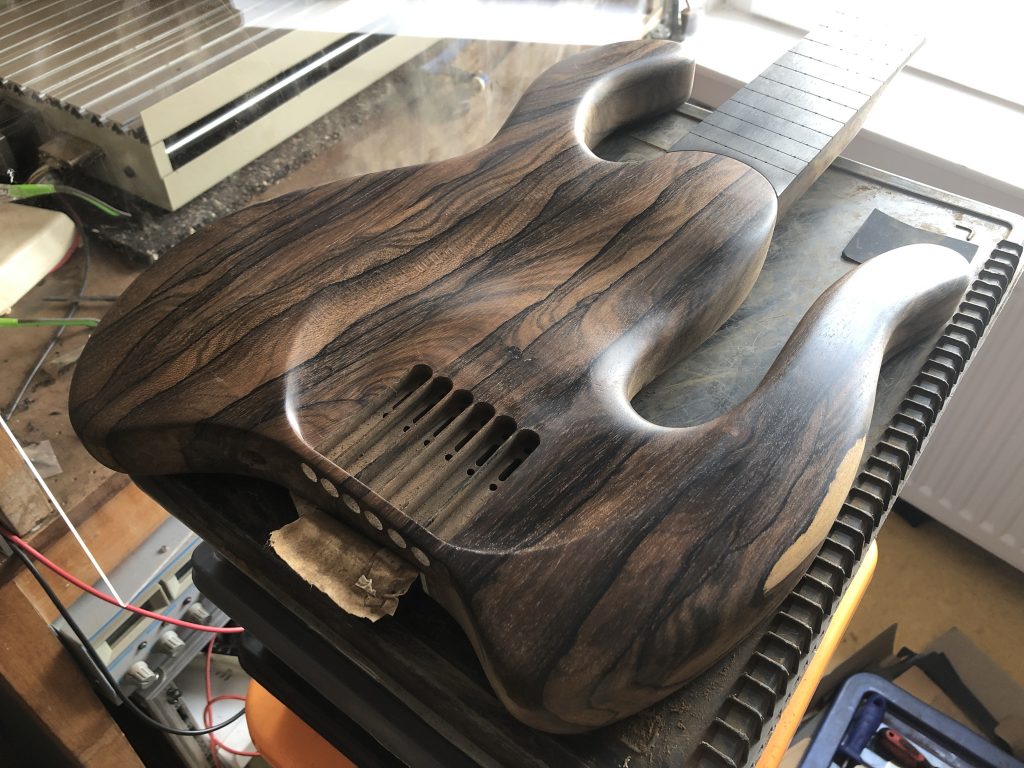
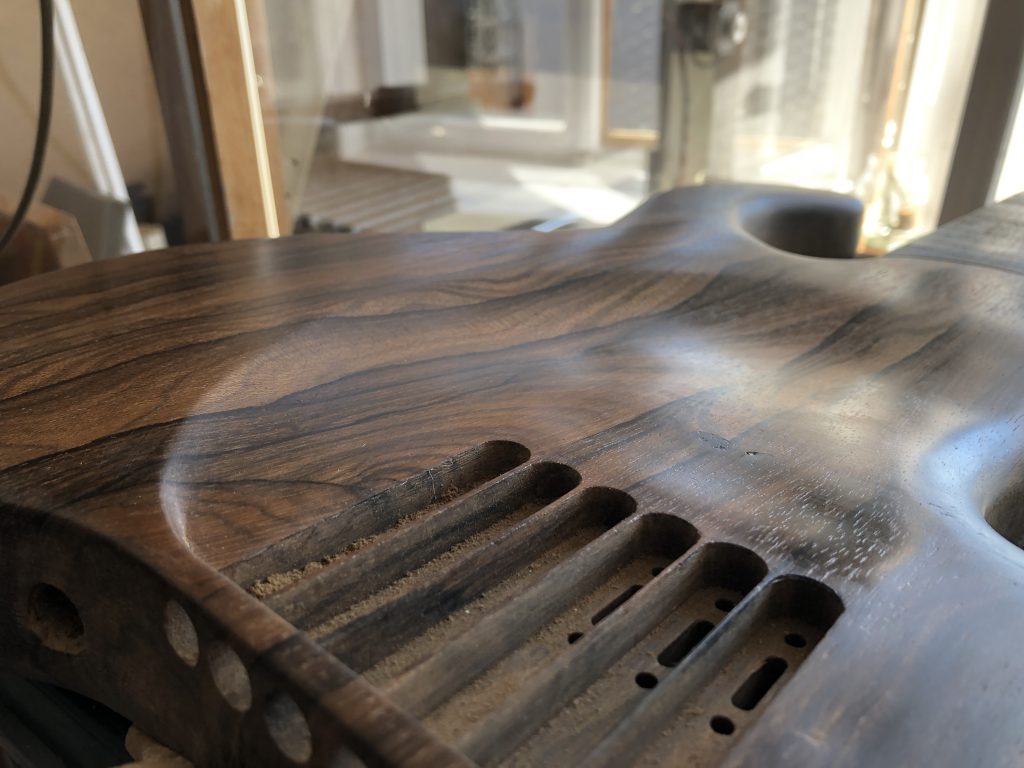
The bottom and the sides still need to be done, though..
Next I plan to do a 3D scan of the top, so I can further deepen the back pockets without accidentally breaking thru the front. Also need to get started on the frets!